Thursday, 28 January 2021

For Sale

 The Panther chassis number CHA602 with all fittings except the lower rear (available from the POC) for a swinging arm Panther and the Streamline Regal sidecar body is for sale.

The chassis is fully restored with new plates and welds to the corroded areas, new swing-arm bearings and spare wheel carrier all as detailed in the blog. The Streamline Regal child/adult sidecar body has a repaired frame and is clad in steel sheet in good condition with the original upholstery. all ready to fit to your late Heavyweight Panther and forget.

Streamline Regal on my M120


The top is removable by removing the hinge pins.
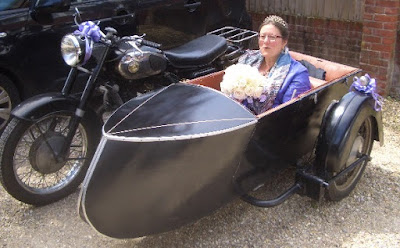
Susan Wilson off to be married.


Panther Chassis with glass fibre mudguard.

An alternative body is available as a single seater with storage compartment. this is a modified Garrard (I think) with new plywood frame.


Price £1100 ono. Contact Laurie on laurence.e.neal@virginmedia.com

Wednesday, 27 January 2021

A Different Sidecar

Having decided to keep the Swallow sidecar but sell the outfit I extracted my spare sidecar body from the depths of the garage. This is a Streamline Regal which was given to me at the Kiel Rally a few years ago. I had travelled there with Rex in my van with our two Panthers, both M100 rigids, in the back. From Poldi’s house in Osterholz-Scharmbeck, outside Bremen, we all rode up together to the campsite at Falkenstein on the side of Kiel Fjord and enjoyed a wonderful rally. Back at Poldi’s we loaded the bikes and I was then presented with a sidecar body in flat-pack form. This we slid on top of the bikes and brought back to England.


As usual with old sidecars I found that the frame was badly rotted, particularly the floor of pine boards though the steel skin panels were in good condition. Most of the fabric lining and the seats were also reusable. With a new floor of inch thick plywood and the frame repaired the panels went back on to make quite a presentable child/adult sidecar.


Loosely assembled Streamline Regal


Nameplate


Frame repair underway

As I already have two swinging-arm Heavyweights I had always intended to pass this one on when it was finished. A buyer has already turned up locally. At the viewing the bike started first kick and ticked over steadily. We have agreed a price just for the motorcycle without the sidecar. Now I am removing the sidecar chassis and replacing the leading links with a set of standard Panther late-type telescopic forks, luckily I already have all the parts to hand.

To complete the chassis for photos for the Blog I had robbed my other chassis of its mudguard and needed that back. I had a batch of five made in glass fibre; they turned out as a lovely job each one indistinguishable from a steel mudguard unless you tap it. These were popular and are now all sold. The new mudguard was moulded in black and didn’t need painting. I fitted steel straps at the fixing points and it has completed the chassis.


This Blog is available as a book, A5 size paperback in full colour. Price £10 free postage, Paypal friends and family to laurence.e.neal@virginmedia.com


Monday, 29 June 2020

Putting it all together.

The bike is now together and starts ok, the sidecar is reassembled and sprayed and just awaiting the Perspex and rubber for the windows and the chassis is  repaired and painted, so what's next. Perhaps I should try the bike up the road.
 
In solo form.


       I have a Douglas Dragonfly and a Panther 10/3 both with Earles forks, a leading link design, so this Panther with its home-made leading links should be no problem. I fired it up and set off up the road and was suddenly in fear of my life! The handling was terrible; the bike wanted to fall over. In fifty yards I turned round, carefully, and went back home. I checked it over and decided the head bearings were a bit tight so slackened them off a bit. I also removed the steering damper, then left the machine in the garage for a week to cool off; me not the bike!
        On a sunny Sunday I decided to try again and set off up the road and onto the industrial estate, nice wide roads and car parks all completely empty. It went like a dream and handled well if slightly differently than a tele forked machine, but once used to it the bike seemed fine. Only one problem surfaced which I had noticed in moving the bike around. There is a misalignment in the forks as the handlebar is off to one side slightly when running straight ahead. I think the two main fork legs are not bent equally so I shall need to strip the forks and investigate. Otherwise all seem fine.
          I stripped out the forks, heated one leg cherry red and tweaked the bend so that it aligned with the other one. When reassembling I set the leading link on the rearmost holes to give the least trail so that should give quick handling on the outfit.
          I decided to fit the sidecar chassis. As it came off this bike that should have been easy but all the fittings needed adjustment in thread lengths etc. so it proved to be time consuming. Eventually all was together with about two inches of toe-in and a bit of lean-out. I can't check the handling until the body is on.
 
Chassis fitted


        Completion of the sidecar body was delayed as the cut-to-size 3mm Perspex panels didn't arrive. A phone call resulted in two sets of panels, handy as I'd mismeasured one and now had plenty. Finished window panes were cut to shape on a bandsaw using card templates taken from the body panels with allowance for the rubber. The new oval rear window had to be curved and this needed to be heated to about 150 degrees F in the oven to get the curvature right. The two-part rubber was time consuming to fit and needed a special tool and lots of soapy water to insert the sealing strip.
        I installed all the lining panels and the door and boot handles and locks. The locks came apart after soaking in diesel and I found some keys which would go in. Any tumblers which stuck out with the key in place were filled off so now the locks work just fine.
        For the new roof I sourced some waterproof canvas on Ebay and used an old manual sewing machine to stitch the hems. With new pop fasteners and aluminium gutter trim I managed to achieve a taut soft-top. I found this quite satisfying even though I am incapable of sewing a straight line.
        The body was taken into the garage on its trolley and slung from the rafters on ropes so that the chassis could be wheeled beneath it. It was then lowered onto the chassis and bolted down, the holes having been drilled in the floor board to match the chassis before the body was built. That is a lot easier to write than it was to perform.
         I applied a Swallow transfer to the nose of the sidecar and a pair of chains to restrain the bootlid. The rear rack and the rusty old silencer came back from the platers and these were fitted and that was about it. I took it up the road and the handling seemed fine although the trip was curtailed by a blockage in the fuel system which gave me a 600 yard push home, rather knackering!
          All in all the Wreck has been turned into quite a presentable outfit. I like the sidecar very much and will probably keep it but I intend to pass the bike and chassis on with a different body fitted. There are one or two minor points to address; the tank has sprung a pinhole leak despite the new lining, the back light is not working, and I need to make a number plate and get it taxed. Generally the whole thing needs shaking down to give a reliable ride.


Boot interior.


New interior, the seat back is original.


There is no more to be said, except ...THE END.

Sunday, 7 June 2020

More Sidecar Work

I now had a new frame for the sidecar and a pile of original aluminium panels. These comprised a wrap-around nose panel, one full right hand side, two parts for the left hand side, the roof, the rear bottom panel, a boot lid and the door. I decided that the non-original roof panel made the inside rather claustrophobic so I cut it on the line of the seat back with the intention of fitting a fabric roof. I also cut an elliptical window at the back. I knocked out what dents I could and set about fitting the panels to the frame. Generally they went on fairly well; both the side panels had to be trimmed a bit at the front as the frame seems to be about half an inch shorter than it was originally. The sides then butted nicely against the nose panel which has a flange wrapping onto the sides. The join is covered by an aluminium trim strip.
         I used fixings as originally fitted; that is flanges wrapped round at the bottom of the sides were pinned using stainless escutcheon pins (with small heads), The windscreen panel, the bottom rear panel and some trim pieces were fixed with pop rivets, and the roof was screwed down using stainless screws with raised countersunk heads. The joints were made good with filler which was also used on some of the damaged areas. The hole for the heater I filled with an alloy disc epoxied in place to an internal plate.
          The door proved quite difficult to fit as the opening was slightly tight but it went in eventually using two hinges as per the original. I found that one four inch hinge cut in half gave two hinges of exactly the right size. The boot lid was also fitted.
          The new roof opening needed a gutter moulding at front and back and I found the right aluminium section locally and this was screwed in place. I also put one on the bottom of the boot lid as it was apparent that water would run down the lid and go straight inside.
           I always intended to spray the body and bought the paint locally, etch primer, primer filler and black top coat. This I applied over several warm days with little wind as I had to do it outside.
 
Etch primer
Primer filler


Top coat.
         Once the paint had hardened off it was cut back and polished. The finish is not brilliant as even with many coats of primer  the pattening of the original paint shows through. I probably should have stripped back to bare metal but it is too late now. The original aluminium trim strips were in good condition although filthy so they were cleaned up and refitted using new stainless screws.          
         While waiting for the window Perspex and the rubber moulding to arrive I started on the internal panels. These were cut from 3mm plywood and were varnished for the inside of the boot and covered in vinyl for the cabin in a tasteful shade of burgundy.
Boot lining panels

Right hand cabin panels

Left hand cabin panels.

          An internet search revealed a 1950 Swallow Sidecar advert and this confirms that this sidecar is indeed a Swallow as suggested by the Jaguar that was fitted to the bonnet. This jaguar is now to be regarded as a Panther. Built as a child/adult the sidecar is now has a single seat. The photos here are later than the advert as they show a Swallow on a Panther chassis.


              Swallow Sidecar Company, Swallow Sidecar and Coachbuilding Company, and Swallow Coachbuilding Company were trading names used by Walmsley & Lyons, partners and joint owners of a British manufacturer of motorcycle sidecars and automobile bodies in Blackpool, Lancashire — later Coventry, Warwickshire — before incorporating a company to own their business which they named Swallow Coachbuilding Company Limited. Under co-founder William Lyons its business continued to prosper as SS Cars Ltd and grew into Jaguar Cars Ltd. The sidecar manufacturing business, by then owned by a different company, Swallow Coachbuilding Company (1935) Limited, was sold by Jaguar to an aircraft maintenance firm, Helliwell Group in January 1946. Sidecars produced at Helliwells' Walsall Airport works were built in the same way as the originals and used the same patented trademark. They closed shop in the late 1950s.
 

Wednesday, 18 March 2020

Refurb of the Sidecar and Chassis

         As my last post showed the sidecar frame virtually fell apart once the aluminium panels were removed. Only two pieces of timber were reusable, the door closure stile and the shaped timber over the windscreen. Using the skin panels as a template I used new timber, only softwood I'm afraid, gluing all the joints and assembling with hex drive furniture screws which came from some old flat-pack furniture; they seem to hold well in end grain as they are designed for chipboard. Curved pieces and the base were cut from a sheet of 25mm ply which happened to be painted blue.


Sidecar frame finished.


         The seat cushion on this sidecar sits in a steel tray let into the floor but both cushion and tray had fallen apart. I bent up a new tray using steel sheet about 16 gauge which came from the front of an old storage heater. Everything comes in handy if you keep it long enough, you will need it the day after you take it to the dump!

Seat tray, old one left, new one right.
   With the frame for the body complete I turned to the chassis. All the Panther chassis are now at least sixty years old and have most likely stood around in damp conditions for many years. The metal is subject to surface rust which is easily cleaned off for repainting, I used a wire brush and then applied a paint which is supposed to kill the rust. At least the rust changed colour!
            A lot of welding needed doing and I am indebted to Rex Norton of Solent Section POC who not only came round with his TIG set but also supplied some beer to keep us going. Needless to say he did a fantastic job.  The plated areas around the main fixing to the bike and the swinging arm are not fully sealed so internal corrosion had occurred. This would be undetected until failure occurs in the main tubes or more often by penetration of the plate-work.  (See last post). This can be repaired by welding on plates and stiffeners. If the main tubes have failed these can be refurbished by welding in new sections of tube with internal strengthening sleeves but in this case the tubes seem to be sound.

Stiffening to main fitting.


Stiffening to swing arm location.
 
       The swing arm is pivoted at the front on two rubber torsion bushes and movement is controlled by a shock absorber which is exactly the same as those fitted to the motorcycle. The pivot spindle is a half inch diameter bar which is a tight fit in the bushes. The torsion bushes are separated by a tubular sleeve which is held centrally in the housing by a steel ring. The nuts on the spindle were rusted solid so I cut through the spindle each side between the swing arm and the bush; a thin disc in an angle grinder  just fitted. The spindle was then driven out.
         Welding adjacent to the bushes burned out the rubber and destroyed the bushes, allowing the inner tubes and rubbers to slide out. The outer steel tubes of the bushes are a tight fit in the housing and were corroded in place. They were removed by brute force using heat and driving them out with a piece of inch diameter bar and a large hammer. The central spacer with its locating ring came out with the bushes.

Swing arm spindle assembly, 1. Spindle, 2. Self locking nut, 3. Washer, 4. torsion bush, 5. spacer tube,
6. spacer tube location ring.
        
          New torsion bushes can be obtained from Anti-Vibration Methods (Rubber) Ltd of Warminster, Wiltshire, (Reference B636/7). They need to be adjusted in length slightly in a lathe and finished with the inner tube flush at one end and slightly proud of the outer at the other. I measured the distance between the ears of the swing arm and adjusted the overall length of the inner tubes of the two bushes and the spacer to be a snug fit between the ears of the swing arm. This enable me to remove damage caused when they were beaten out of the housing.

New bush, ref B636/7. 2 off required.
 
Housing detail
         The housing for the bearings is made up of two tubes one inside the other welded together at the ends. The inner tube is around 27mm internal diameter where the bushes fit. To install the bushes I made sure there were no burrs or damage to the housing giving it a gentle hone. One bush was lightly greased and pressed into place with the outer ring flush with the face of the housing and the inner protruding slightly. I put the locating ring back on the tube spacer and pressed that into the housing using the spindle as a guide to ensure it remained central. A little grease and the second bush eased into position, again with the spindle in place to ensure concentricity. I then removed the spindle, offered up the swing arm, inserted the spindle and fitted the washers and nuts. these were tightened against the inner tubes of the bushes with the shock absorber in place and the swing arm in the unloaded position.
 
Chassis put together and painted.


Chassis fittings.

Saturday, 1 February 2020

The Sidecar

The Panther Wreck came with a single seat sidecar which showed signs of its twenty year sojourn outside in all weathers.

The proud (!) new owner and the outfit on the trailer.


The sidecar is a single-seater with an aluminium skin on a timber frame. The floor of timber boards, the bottom rails and indeed all the timber frame below the window line is badly rotted but the skin is in fair condition. The sidecar has clearly seen a lot of use and has been heavily modified for comfort. It is fitted with a clock, cigarette lighter, radio, lighting and heating for the passenger. Heating was provided by an attachment clamped to the left hand exhaust pipe and fed into the passenger space. The radio and clock are rusted out and all the switches are seized.
        The whole body has been lined in a blue velvety material on hardboard although most of that is beyond repair.
 
The sidecar dashboard with glove box, light, clock, cigarette lighter and radio.
The heating system. The large part is clamped to the right hand exhaust pipe and connected to a hole in the sidecar skin via a rubber adapter and a flap valve to shut  off the air flow.

            One window and the rear panel are decorated with several stickers, shown here, plus one for Britanny Ferries, these appear to predate Eric's ownership.


Stickers for a Dutch campsite, the 1980 Dragon Rally, and the Isle of Man TT.
      It is not easy to identify sidecars which, as in this case, have no identity plates, badges or transfers but the best guess is that is a Swallow Tudor. Swallow of course went on to build Jaguar cars and there is a small chrome Jaguar (or Panther) on the front panel.

Is it one of these?


This Jaguar (Panther) is bolted on the bonnet.

       As I cleared out the debris from inside it became clear that the framing is in very poor condition, indeed worse than I first thought. The floor of pine boards virtually dropped out when I picked the body up. The bottom rails, also softwood, were also very soft and dropping apart. The further I went the worse it got so that eventually I decided to remove all the skin and get down to the bare framework. Finally the only pieces of timber reusable were the angled door-closing rail and the top, front cross rail.
       The roof sheet is of aluminium and non-original; it was presumably added by one of the previous owners. This was fixed with brass screws which all came out fairly easily. as did the stainless screws fixing the aluminium trim. Front and rear panels and trims around the door were held with pop rivets and these were drilled out. The skin had been folded over the timber and fixed with pins during manufacture. These had to be prised out. Eventually I had a pile of panels and the rotten remains of the frame.

Part way through dismantling/

The remains of the frame.

Panels.
        
           The Panther chassis that came with the sidecar is fairly rusty but largely sound apart from the plating around the swing arm pivot. This is tricky to repair as welding could affect the rubber bearing for the swing arm. The mudguard is scrap but the tow-bar and spare wheel carrier appear to be ok, albeit home-made.

The Panther Chassis.


Plating by the swing arm bearing rotted out.

               The rebuild is underway.